Creating and maintaining a watchlist
A watchlist is a list of products and packages that you want to track.
This is the most important step in setting up VulnPilot as it will determine what you will be notified about.
You have the control on what a watchlist represents to you, for example:
- The products a specific team or Business Unit is responsible for.
- Linux packages installed on servers, containers, or appliance images.
- A geographical region of interest.
- A specific technical perimeter of interest (workstations, servers, etc.).
Tracking an item means that you want to be notified when a vulnerability is detected for it. VulnPilot will rely on what you have configured in your watchlist to determine on what basis it should populate your monitor, create action plans and notify you.
After your watchlist exists, you can refine how alerts are delivered — including filters, schedules, email, and webhooks — in Configuring notifications.
Action plans, and the monitor are not immediately populated when you create a watchlist. The process starts in the background and will be completed in a few minutes by matching what you have configured in your watchlist with the vulnerability events that happened in the last 30 days. If you need history for a longer period, you can ask us about the legacy module.
Watchlists are created by organization administrators. There are quotas on the number of watchlists you can create for your organization. There are also quotas on the number of items you can track in a watchlist.
Contact us if you need to increase these quotas.
Creation workflow
You can create a watchlist from the watchlist page by clicking the “Create watchlist” button.
You will be guided through the creation workflow by following the steps below.
- Select the asset types you want to track: this will help us suggest products and vendors for you.
- Select the products and/or packages you want to track: anytime something new is detected for those items, VulnPilot will process it for you.
- Specify the name of your watchlist.
- Click the “Create watchlist” button: at this point, your changes will be saved.
- Add members to your watchlist: note that organization administrators have access to all watchlists by default.
Products versus packages in the picker
On the selection step, use the Products and Packages tabs:
- Products — vendor catalog software (current behaviour: search products and vendors, use suggestions from your asset types).
- Packages — Linux distribution packages. Filter by package manager and distribution family, search by name, then add the package you want to monitor.
The UI keeps these kinds distinct so a package is never mistaken for a product. Selected items show a package indicator when they are packages. For more detail on the package catalog itself, see Packaged software.
Adding packages to a watchlist
You can add packages when creating a watchlist or when editing an existing one:
- Open the watchlist workflow (create from watchlists, or Edit products from a watchlist details page).
- Go to the step where you select catalog items.
- Open the Packages tab.
- Optionally filter by package manager (for example
apk,dpkg,rpm) and distribution, then search by package name. - Click a package to add it to the selection (click again to remove it before saving).
- Continue the workflow and save. Package members are stored separately from product members.
Packages and products share the same watchlist item quota. If you reach the organization limit, remove unused items or contact us to raise the quota.
Browse and inspect package versions and “fixed in” advisories in the Packages catalog before adding them to a watchlist.
Update your watchlist
From the watchlist page, you can open the details of the watchlist of your choice by clicking on it.
The details page will allow you to perform quick actions on your watchlist, such as renaming it or deleting it.
You can also replay parts of the onboarding workflow to add or remove products and packages from your watchlist or change the items you want to track.
You can also redo the entire onboarding workflow. It won’t reset your watchlist, but it will allow you to change every aspect of it.
On the watchlist details page, scope badges label each member as Product, Package, or Vendor so membership stays unambiguous.
Import products from file
If you already have a product inventory in a spreadsheet or document, you can bulk-import items into a watchlist instead of adding them one by one.
From the watchlist details page, click Import from file in the Products section. You can also open Import History from the watchlist page to review past imports or resume a draft.
File import is available on Pro, Business, and Enterprise plans. You need permission to edit the watchlist, the same as for Edit Products.
Supported file formats include CSV, Excel (.xlsx), PDF, images, and Word documents. Uploaded data is staged in a draft first — nothing is added to the live watchlist until you review and confirm the import.
Non-CSV and non-Excel files are sent to an external service provided by Mistral for processing and AI analysis of the documents.
The import workflow has three steps. Column matching is always shown after the file is read. VulnPilot does not skip it when headers were recognized automatically.
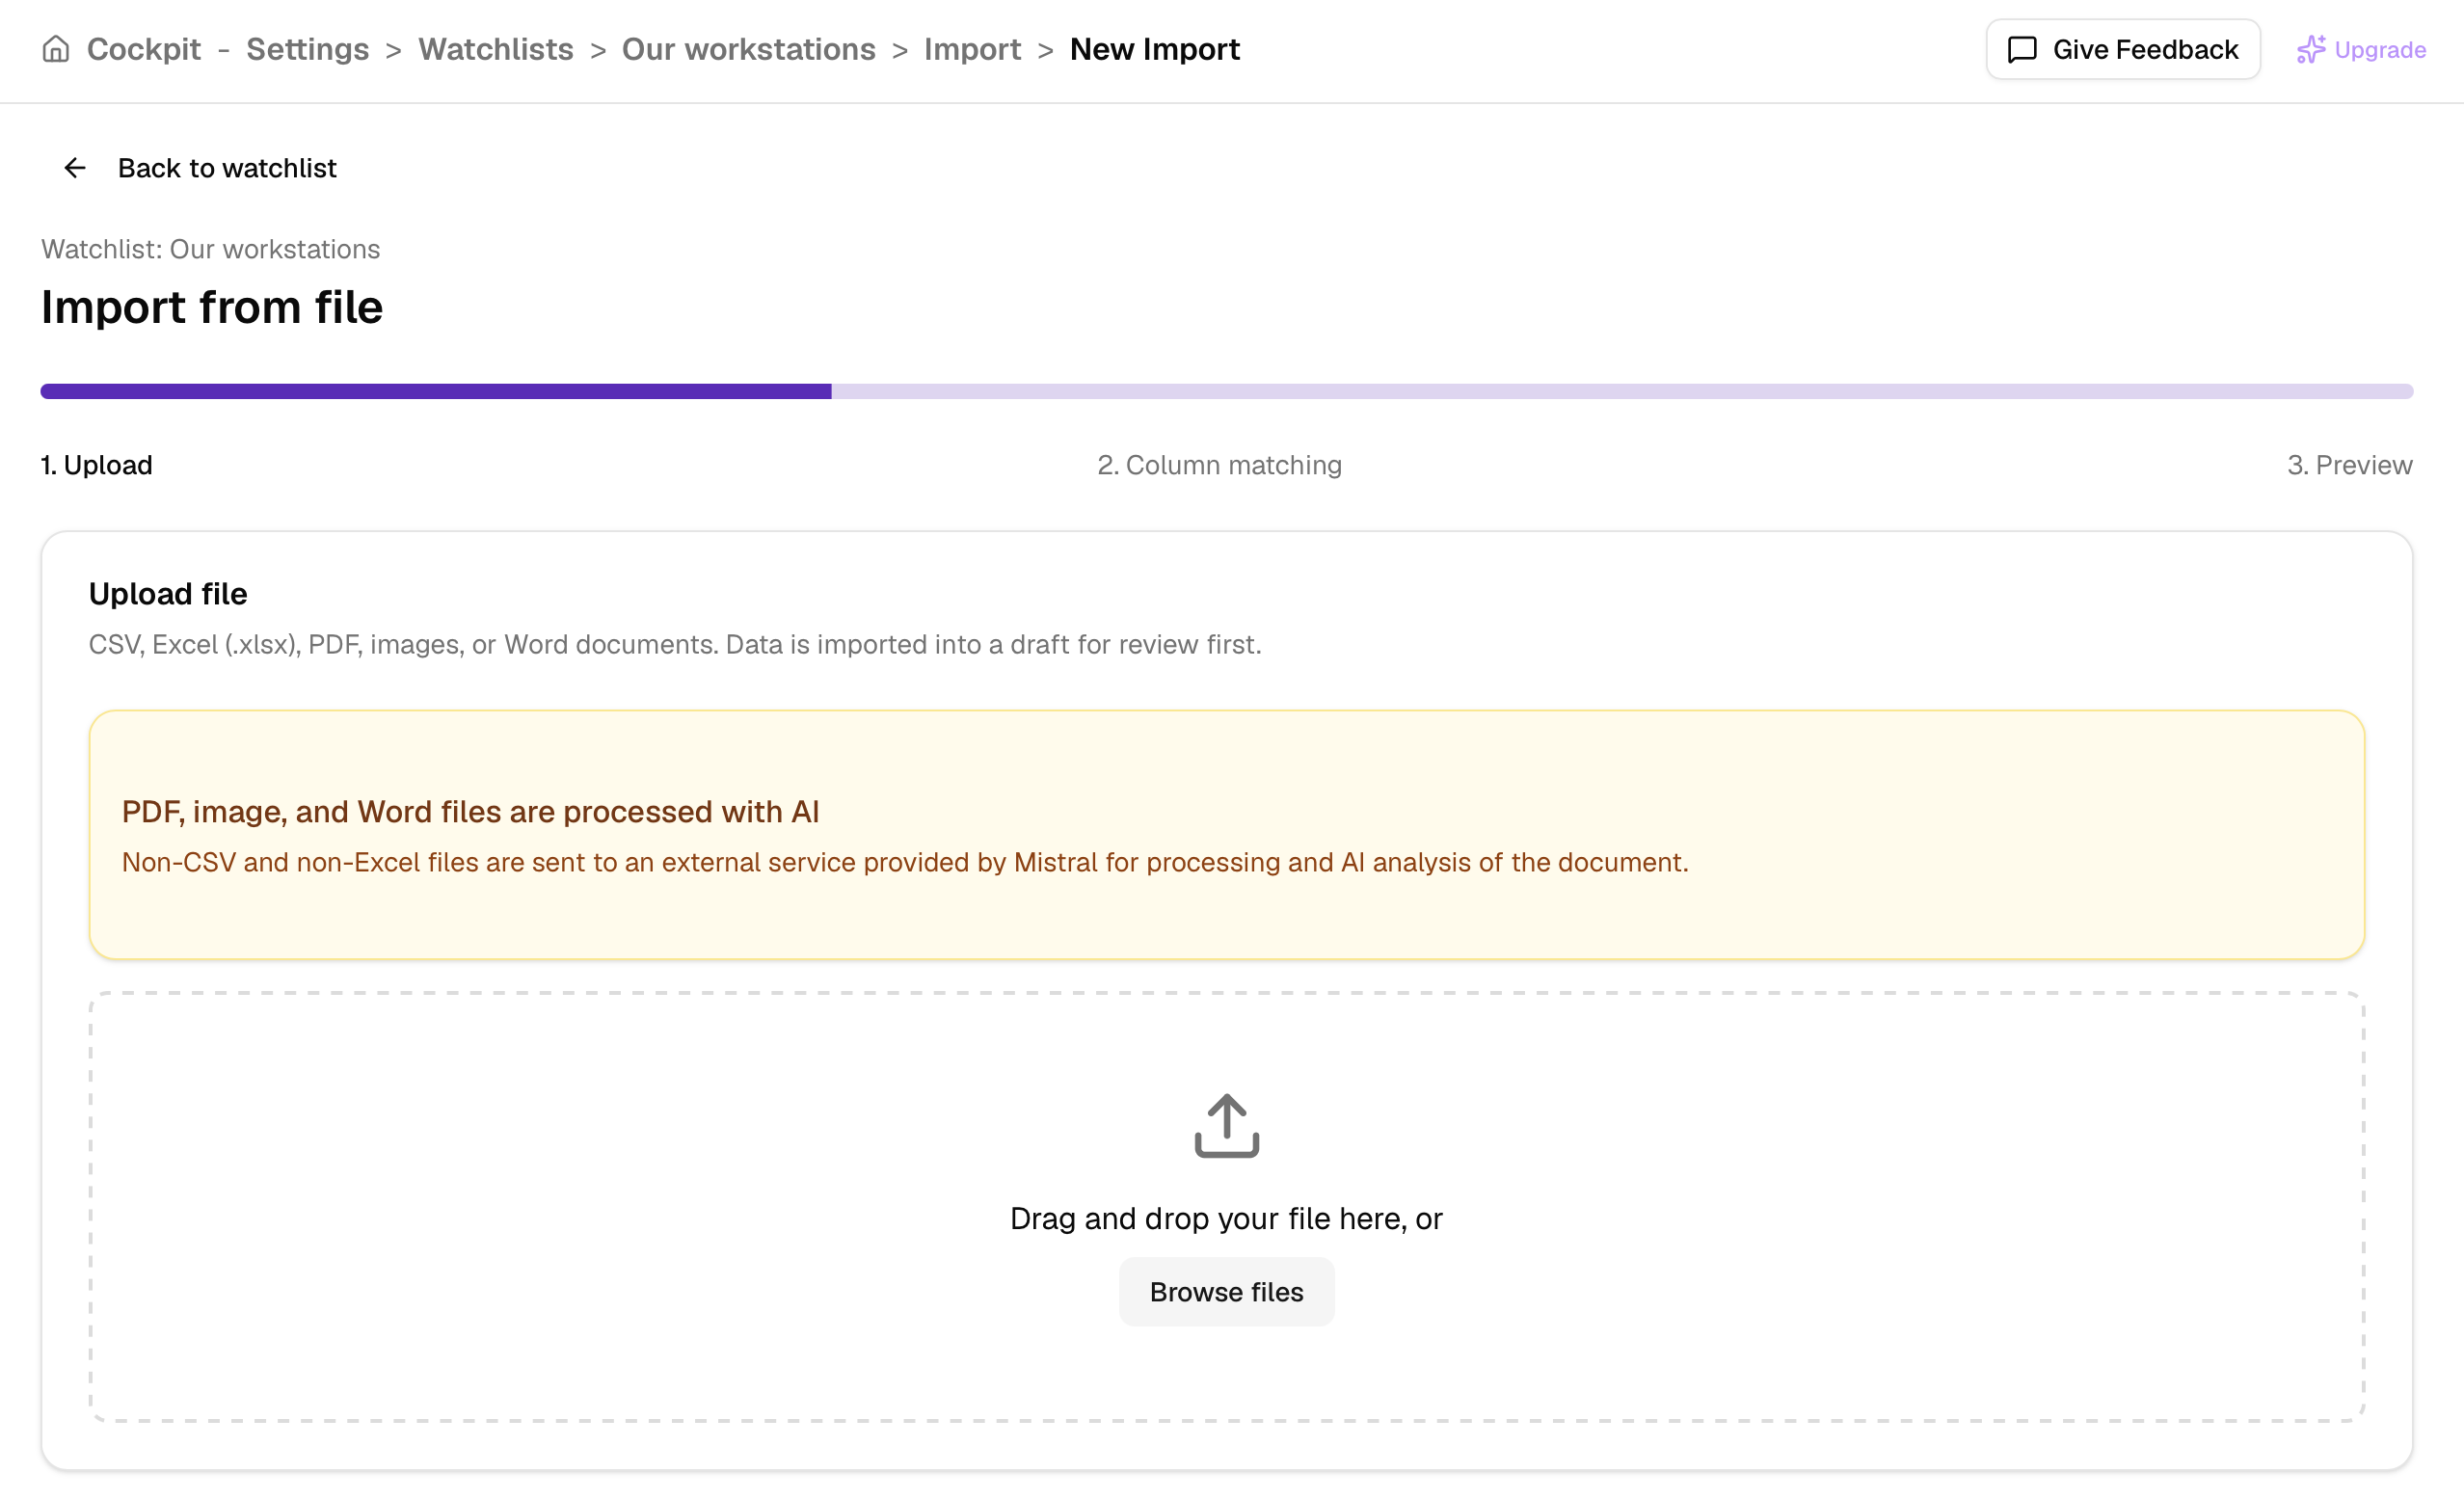
- Upload: drag and drop a file or browse to select one.
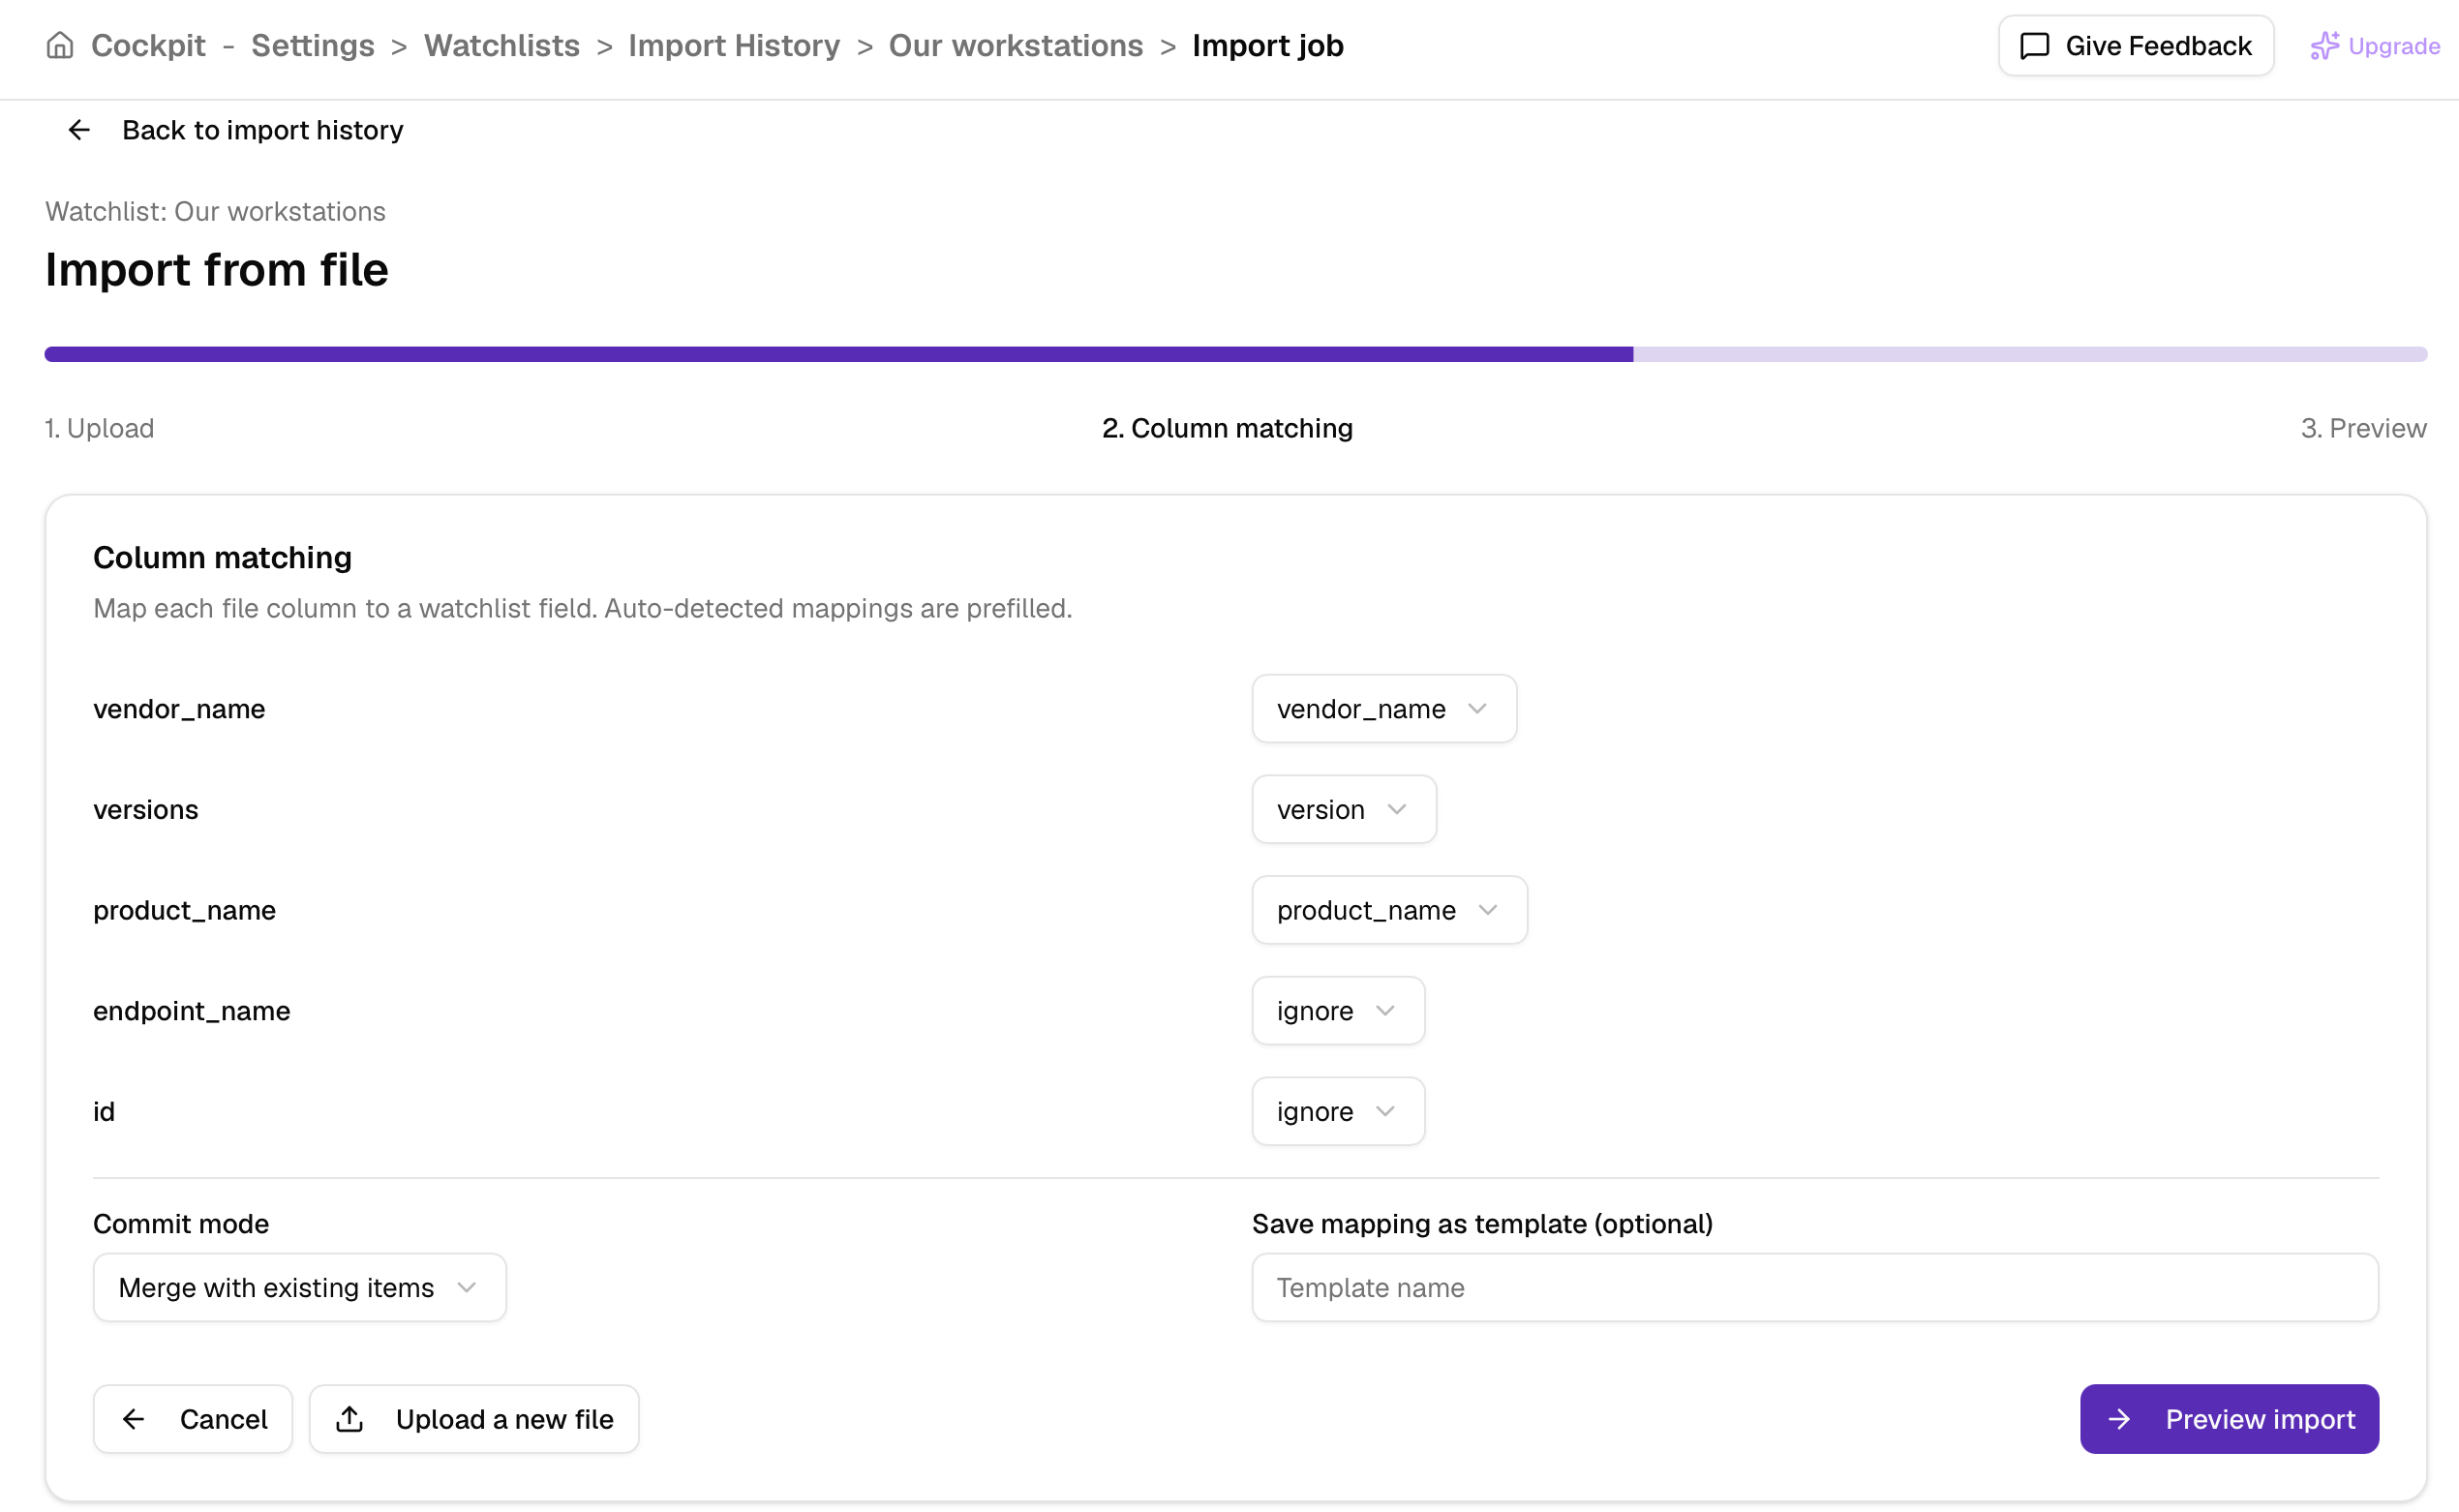
- Column matching: confirm how each column in your file fills a watchlist field (product name, vendor name, version, exposure, criticality, comment, or tags). Suggested mappings are prefilled from the header names. They are suggestions: a column can be recognized as the wrong field, so review every row of the mapping before you continue. Change the field when it does not match the column, or set it to Ignore to leave that column out. At least one column must be product name or vendor name. You can save the mapping as a template for the next import. Choose whether imported items should merge with existing items or replace existing items, then click Preview import.
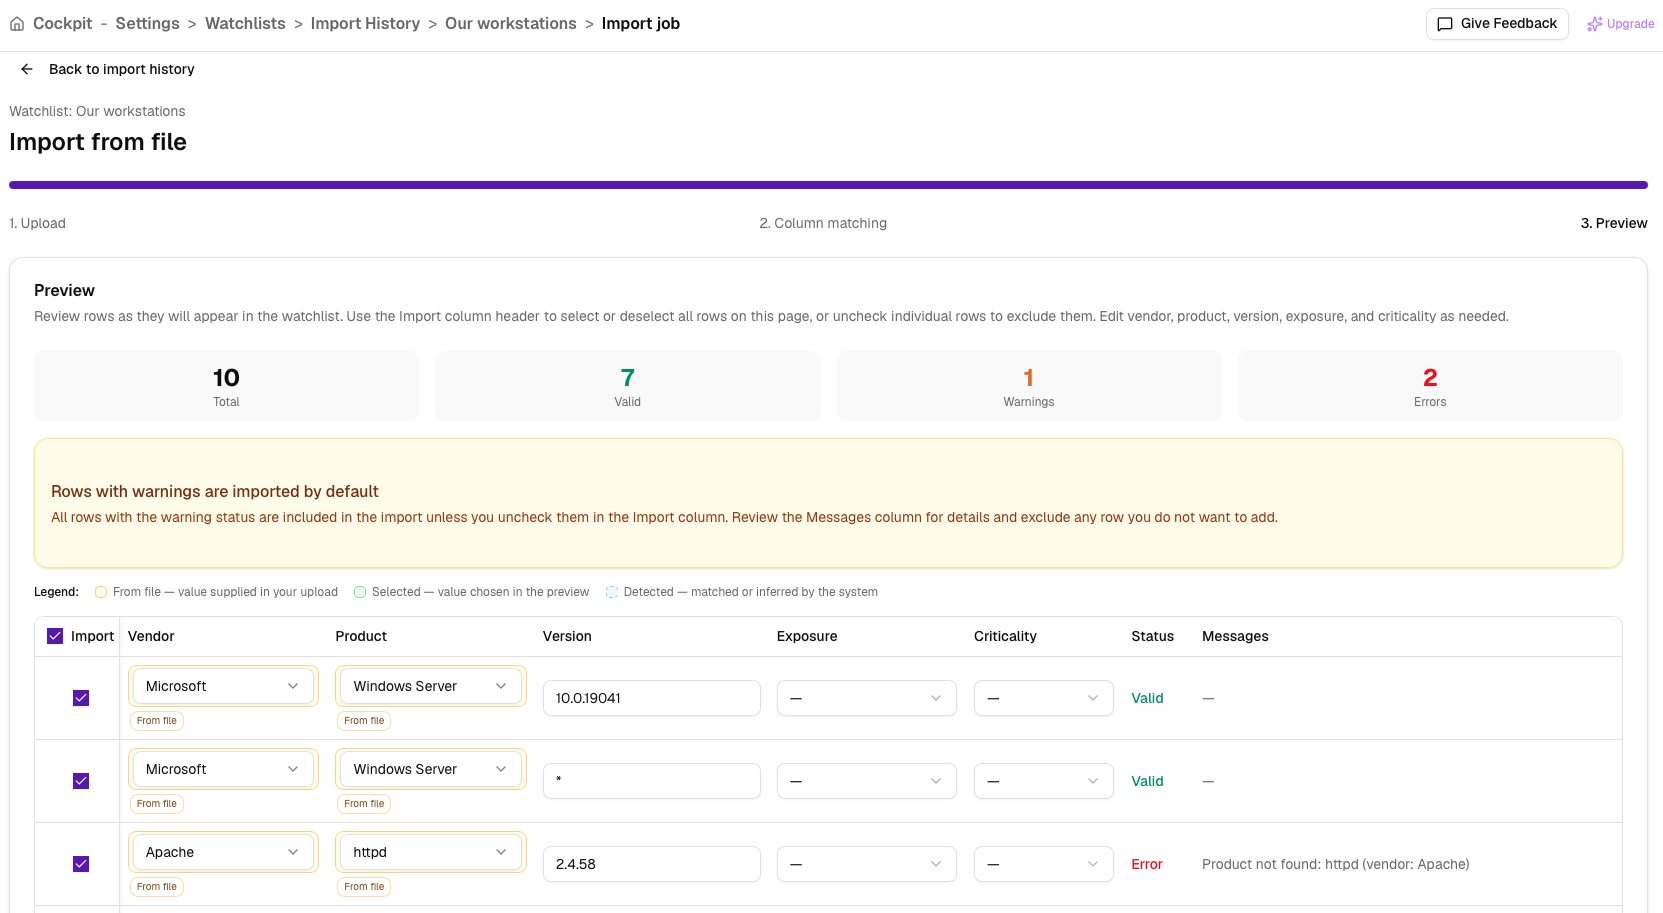
- Preview: review every row as it will appear in the watchlist. Exclude individual rows, fix vendor or product matches, and resolve validation warnings or errors before committing. If a column was assigned to the wrong field, use Edit mappings to return to column matching and correct it. Preview does not replace that check.
Upload is a drag-and-drop area. PDF, image, and Word files show the external-processing notice before you choose a file.
Column matching lists every file column beside the watchlist field VulnPilot suggested. Change a suggestion, or set the column to ignore, then choose merge or replace and click Preview import.
Preview shows how many rows are valid, warnings, or errors. Uncheck a row to leave it out. Rows with errors are not imported.
When you commit an import, VulnPilot applies the changes in the background. Track progress from Import History, where you can open a job, cancel an in-progress import, or delete completed drafts.
While rows with validation warnings are imported with the specified caveats, rows with validation errors are not. You can export a CSV of rows with warnings or errors from the preview step to fix them offline and upload again.
Example file
A CSV or Excel file needs one header row. Names such as Product, Vendor, Ver, or Notes are used only to suggest a mapping. On the column matching step, confirm that each suggestion is the field you expect before you preview. Each data row is one product (or, if you leave the product blank, one vendor).
Use the product and vendor names from the VulnPilot catalog. A close name can still import, with a warning you can correct in the preview step.
| Product name | Vendor name | Version | Exposure | Criticality | Comment | Tags |
|---|---|---|---|---|---|---|
| Apache HTTP Server | Apache Software Foundation | 2.4.58 | internet | critical | Edge reverse proxy | dmz, web |
| Windows 11 25H1 | Microsoft | all | local network | medium | Workstation image | endpoint |
| OpenSSL | OpenSSL | 3.* | local machine | critical | TLS library | crypto |
| PostgreSQL | PostgreSQL | all | internet | medium | Primary database | database |
| nginx | F5 | 1.24 - 1.26 | restricted admin network | low | ingress |
The same rows as CSV:
Product name,Vendor name,Version,Exposure,Criticality,Comment,Tags
Apache HTTP Server,Apache Software Foundation,2.4.58,internet,critical,Edge reverse proxy,"dmz, web"
Windows 10,Microsoft,21H2,local network,medium,Workstation image,endpoint
OpenSSL,OpenSSL,3.*,local machine,critical,TLS library,crypto
PostgreSQL,PostgreSQL,all,internet,medium,Primary database,database
nginx,F5,1.24 - 1.26,restricted admin network,low,,ingress| Column | Required | What to put in the cell |
|---|---|---|
| Product name | Product or vendor, at least one | Catalog product name. |
| Vendor name | Product or vendor, at least one | Catalog vendor name. A vendor-only row imports the vendor, with a warning. |
| Version | No | An exact version (2.4.58), a major line (3.* or 21), a range (1.24 - 1.26), or all, *, or any. Comparisons such as >=1.24 combined with <1.27 also work. A blank cell monitors every version. |
| Exposure | No | internet, local network, local machine, or restricted admin network. A blank cell means local network. Also accepted: public, external, lan, internal, localhost, host, admin, restricted, management. |
| Criticality | No | critical, medium, or low. A blank cell means medium. high and mission critical are treated as critical. |
| Comment | No | Free text stored on the watchlist item. |
| Tags | No | Labels separated by commas inside a single cell, for example dmz, web. |
Values are not case-sensitive. Underscores and hyphens in exposure are treated as spaces, so local_network and local-network both mean local network.
Watchlist sensitivity level
The sensitivity level of a watchlist determines how much noise you want to tolerate in your monitor. This is used to set thresholds to adjust the priorization scoring process. It will influence the BeeScore displayed for each action plan and vulnerability in your monitor.
The sensitivity level can be set to:
- Low: this will result in a more relaxed scoring process.
- Medium: this will result in a moderate scoring process.
- High: this will result in a more strict scoring process.
The sensitivity level will have a threshold impact on the priorization scoring process. This means that the higher the sensitivity level, the more noise you will tolerate in your monitor.
Delete your watchlist
You can delete your watchlist by clicking the “Delete watchlist” button in the top right corner of the page.
This action is irreversible. All items in the watchlist will be removed and cannot be recovered. Every object related to the watchlist will be deleted as well (action plans, monitor, notifications, etc.).
Frequently asked questions
How do I add a product to my watchlist?
You can add a product to your watchlist by clicking the “Edit products” button in the watchlist details page.
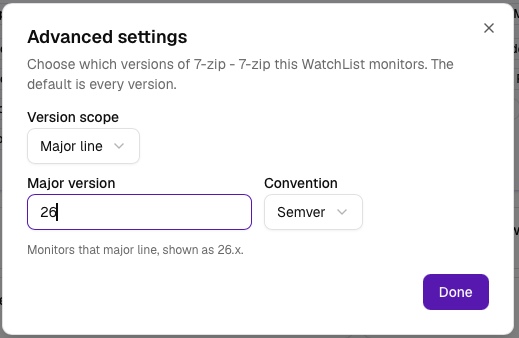
You will be able to search for a product by name or by vendor in the Products tab of the corresponding step of the onboarding workflow. Clicking a product monitors every version. A selected product is labeled Product. The sliders open Advanced settings, where you limit a version, major line, range, or branch.

You can also add a product from the Products catalog, or from a vendor’s product list, and add a vendor from the Vendors catalog.
To add many products at once, use Import from file on the same page. See Import products from file above.
How do I add a package to my watchlist?
Use Edit products (or the create-watchlist workflow), then open the Packages tab on the selection step. Filter by package manager and distribution if needed, search for the package, and add it. See Adding packages to a watchlist. For what package fields mean in the catalog, see Packaged software.
How do I remove a product or package from my watchlist?
You can remove an item from your watchlist by clicking the “Edit products” button in the watchlist details page.
The workflow will allow you to remove selected products or packages from your watchlist (selected chips can be cleared, or you can toggle the item off in the list).